마지막으로 Canvas API를 사용한게 1년은 넘은것 같다.
이번에 되새김이 필요하여 정리해 보았다.
Canvas API - Web APIs | MDN
The Canvas API provides a means for drawing graphics via JavaScript and the HTML <canvas> element. Among other things, it can be used for animation, game graphics, data visualization, photo manipulation, and real-time video processing.
developer.mozilla.org
Canvas는 그래프를 그리거나, 사진을 결합하거나, 간단한 애니메이션을 만드는 데 사용을 고려해 보면 좋습니다.
간단하게 사용법을 정리 한 후 롤렛을 만들어 보겠습니다.
1. 뼈대 코드 구현
index.html
<!DOCTYPE html>
<html lang="ko">
  <head>
    <meta charset="UTF-8" />
    <meta name="viewport" content="width=device-width, initial-scale=1.0" />
    <title>Canvas</title>
    <style>
      canvas {
        border: 1px solid black;
      }
    </style>
  </head>
  <body>
    <canvas id="tutorial" width="150" height="150"></canvas>
    <script src="main.js"></script>
  </body>
</html>
main.js
const canvas = document.getElementById("tutorial");

function draw() {
  // Canvas 지원하는지 안하는지
  if (canvas.getContext) {
    const ctx = canvas.getContext("2d");
    // drawing code here
  } else {
    window.alert("canvas가 지원하지 않는 브라우저입니다.");
  }
}

window.addEventListener("load", draw);
2. Rect
fillRect는 채워진 사각형
clearRect는 공간을 지웁니다. (지우개)
strokeRect는 선만 있는 사격형을 그립니다.
이를 조합하면 아래와 같은 도형을 그릴 수 있습니다. (toturial에 나와있음.)

function draw() {
  // Canvas 지원하는지 안하는지
  if (canvas.getContext) {
    const ctx = canvas.getContext("2d");
    // drawing code here

    ctx.fillRect(25, 25, 100, 100);
    ctx.clearRect(45, 45, 60, 60);
    ctx.strokeRect(50, 50, 50, 50);
  } else {
    window.alert("canvas가 지원하지 않는 브라우저입니다.");
  }
}
3. path로 도형 그리기
시작은 beginPath()로 합니다.
moveTo로 위치를 옮기고,
linTo로 선긋기를 시작합니다.
그 다음 fill로 색을 채웁니다.
function draw() {
  // Canvas 지원하는지 안하는지
  if (canvas.getContext) {
    const ctx = canvas.getContext("2d");
    // drawing code here

    ctx.beginPath();
    ctx.moveTo(75, 50);
    ctx.lineTo(100, 75);
    ctx.lineTo(100, 25);
    ctx.fill();
  } else {
    window.alert("canvas가 지원하지 않는 브라우저입니다.");
  }
}
4. arc와 moveTo로 얼굴 그리기
arc 문법
arc(x, y, radius, startAngle, endAngle)
arc(x, y, radius, startAngle, endAngle, counterclockwise)
function draw() {
  // Canvas 지원하는지 안하는지
  if (canvas.getContext) {
    const ctx = canvas.getContext("2d");
    // drawing code here

    ctx.beginPath();
    ctx.arc(75, 75, 50, 0, Math.PI * 2, true); // Outer circle
    ctx.moveTo(110, 75);
    ctx.arc(75, 75, 35, 0, Math.PI, false); // Mouth (clockwise)
    ctx.moveTo(65, 65);
    ctx.arc(60, 65, 5, 0, Math.PI * 2, true); // Left eye
    ctx.moveTo(95, 65);
    ctx.arc(90, 65, 5, 0, Math.PI * 2, true); // Right eye
    ctx.stroke();
  } else {
    window.alert("canvas가 지원하지 않는 브라우저입니다.");
  }
}
연필로 그림을 그린다고 생각하고 보면 이해가 편합니다.,
처음에 큰 원을 그리고 웃는 반원을 그리기 위해 moveTo로 오른쪽으로 좀 이동한 후에(x 방향을)
호를 절반만 그린다음에, 다시 눈 그릴 위치로 이동 한 후에 그린 것입니다.

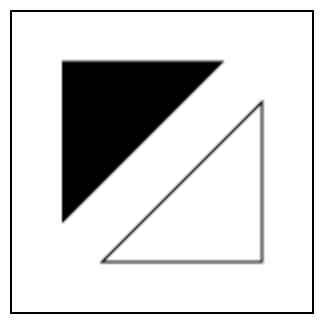
5. lintTo() 더 알아보기
function draw() {
  // Canvas 지원하는지 안하는지
  if (canvas.getContext) {
    const ctx = canvas.getContext("2d");
    // drawing code here
    // Filled triangle
    // 선을 2개만 긋고, fill로 내부 색상 채움.
    ctx.beginPath();
    ctx.moveTo(25, 25);
    ctx.lineTo(105, 25);
    ctx.lineTo(25, 105);
    ctx.fill();

    // Stroked triangle
    // 선을 2개를 긋고, closePath로 시작지점까지 선 긋기
    ctx.beginPath();
    ctx.moveTo(125, 125);
    ctx.lineTo(125, 45);
    ctx.lineTo(45, 125);
    ctx.closePath();
    ctx.stroke();
  } else {
    window.alert("canvas가 지원하지 않는 브라우저입니다.");
  }
}
beginPath()는 선을 긋기 시작할때 씁니다.
closePath()는 선을 다시 초기 시작점으로 이동하는데 쓰입니다.
Stroked triangle을 보면 알 수 있듯이 라인을 2개만 긋고, closePath로 시작 지점으로 가서 자연스럽게 삼각형을 만들었습니다.
허나 fill()로 선 내부의 색을 채울때는 마지막 선을 긋지 않아도 채워지면서 닫힙니다.
6. 여러가지 호 그려보기
function draw() {
  // Canvas 지원하는지 안하는지
  if (canvas.getContext) {
    const ctx = canvas.getContext("2d");
    // drawing code here
    for (let i = 0; i < 4; i++) {
      for (let j = 0; j < 3; j++) {
        ctx.beginPath();
        const x = 25 + j * 50; // x coordinate
        const y = 25 + i * 50; // y coordinate
        const radius = 20; // Arc radius
        const startAngle = 0; // Starting point on circle
        const endAngle = Math.PI + (Math.PI * j) / 2; // End point on circle
        const counterclockwise = i % 2 !== 0; // 시개방향 false, 시간 반대방향 true

        ctx.arc(x, y, radius, startAngle, endAngle, counterclockwise);

        if (i > 1) {
          ctx.fill();
        } else {
          ctx.stroke();
        }
      }
    }
  } else {
    window.alert("canvas가 지원하지 않는 브라우저입니다.");
  }
}
추가로 canvas height를200을 바꿔줍니다.
<canvas id="tutorial" width="150" height="200"></canvas>
arc는 직접 값을 입력하면서 사용해보면 이해가 편합니다
7. 2차 베지어 곡선
문법
quadraticCurveTo(cpx, cpy, x, y)cp: 제어점 (중간에 들릴 위치)
x,y, : 끝점(도착지점)
https://developer.mozilla.org/en-US/docs/Web/API/CanvasRenderingContext2D/quadraticCurveTo
function draw() {
  // Canvas 지원하는지 안하는지
  if (canvas.getContext) {
    const ctx = canvas.getContext("2d");
    // drawing code here
    ctx.beginPath();
    ctx.moveTo(75, 25);
    ctx.quadraticCurveTo(25, 25, 25, 62.5);
    ctx.quadraticCurveTo(25, 100, 50, 100);
    ctx.quadraticCurveTo(50, 120, 30, 125);
    ctx.quadraticCurveTo(60, 120, 65, 100);
    ctx.quadraticCurveTo(125, 100, 125, 62.5);
    ctx.quadraticCurveTo(125, 25, 75, 25);
    ctx.stroke();
  } else {
    window.alert("canvas가 지원하지 않는 브라우저입니다.");
  }
}
ctx.quadraticCurveTo(25, 25, 25, 62.5)만 봤을때,
좌표상으로 (25,25)를지나 (25,62.5)를 도착하는 곡선을 만든다고 생각하면 이해가 편합니다.

전체 도형

8. 3차 베지어 곡선
문법
bezierCurveTo(cp1x, cp1y, cp2x, cp2y, x, y)
function draw() {
  // Canvas 지원하는지 안하는지
  if (canvas.getContext) {
    const ctx = canvas.getContext("2d");
    // drawing code here
    // Cubic curves example
    ctx.beginPath();
    ctx.moveTo(75, 40);
    ctx.bezierCurveTo(75, 37, 70, 25, 50, 25);
    ctx.bezierCurveTo(20, 25, 20, 62.5, 20, 62.5);
    ctx.bezierCurveTo(20, 80, 40, 102, 75, 120);
    ctx.bezierCurveTo(110, 102, 130, 80, 130, 62.5);
    ctx.bezierCurveTo(130, 62.5, 130, 25, 100, 25);
    ctx.bezierCurveTo(85, 25, 75, 37, 75, 40);
    ctx.fill();
  } else {
    window.alert("canvas가 지원하지 않는 브라우저입니다.");
  }
}

자표로 생각하고 그리는게 가능한가 싶다..
9. Path2D
Path2D api를 사용하여 도형을 미리 만들 수도 있습니다.
function draw() {
  // Canvas 지원하는지 안하는지
  if (canvas.getContext) {
    const ctx = canvas.getContext("2d");
    // drawing code here

    const rectangle = new Path2D();
    rectangle.rect(10, 10, 50, 50);

    const circle = new Path2D();
    circle.arc(100, 35, 25, 0, 2 * Math.PI);

    ctx.stroke(rectangle);
    ctx.fill(circle);
  } else {
    window.alert("canvas가 지원하지 않는 브라우저입니다.");
  }
}

모든 instance method, properties는 아래의 링크에서 확인할 수 있다.
https://developer.mozilla.org/en-US/docs/Web/API/CanvasRenderingContext2D
CanvasRenderingContext2D - Web APIs | MDN
The CanvasRenderingContext2D interface, part of the Canvas API, provides the 2D rendering context for the drawing surface of a <canvas> element. It is used for drawing shapes, text, images, and other objects.
developer.mozilla.org
10. lineWidth
function draw() {
  // Canvas 지원하는지 안하는지
  if (canvas.getContext) {
    const ctx = canvas.getContext("2d");
    // drawing code here

    for (let i = 0; i < 10; i++) {
      ctx.lineWidth = 1 + i;
      ctx.beginPath();
      ctx.moveTo(5 + i * 14, 5);
      ctx.lineTo(5 + i * 14, 140);
      ctx.stroke();
    }
  } else {
    window.alert("canvas가 지원하지 않는 브라우저입니다.");
  }
}
라인 두께는 어떻게 그려지는 좌표에서 좌,우로 두께가 정해집니다.

11. lineCap
속성 lineCap은 모든 선의 끝점을 그리는 방법을 결정합니다. 이 속성에는 세 가지 가능한 값이 있습니다.
선의 끝은 끝점에서 사각형으로 그려집니다.
선의 끝은 둥글게 처리됩니다.
너비가 같고 높이가 선 두께의 절반인 상자를 추가하여 선 끝을 사각형으로 만듭니다.
function draw() {
  // Canvas 지원하는지 안하는지
  if (canvas.getContext) {
    const ctx = canvas.getContext("2d");
    // drawing code here

    ctx.strokeStyle = "#09f";
    ctx.beginPath();
    ctx.moveTo(10, 10);
    ctx.lineTo(140, 10);
    ctx.moveTo(10, 140);
    ctx.lineTo(140, 140);
    ctx.stroke();

    // Draw lines
    ctx.strokeStyle = "black";
    ["butt", "round", "square"].forEach((lineCap, i) => {
      ctx.lineWidth = 15;
      ctx.lineCap = lineCap;
      ctx.beginPath();
      ctx.moveTo(25 + i * 50, 10);
      ctx.lineTo(25 + i * 50, 140);
      ctx.stroke();
    });
  } else {
    window.alert("canvas가 지원하지 않는 브라우저입니다.");
  }
}
12. lineJoin
연결된 세그먼트의 공통 끝점 중심에 디스크의 추가 섹터를 채워 모양의 모서리를 둥글게 만듭니다. 둥근 모서리의 반경은 선 너비의 절반과 같습니다.
연결된 세그먼트의 공통 끝점과 각 세그먼트의 별도 외부 직사각형 모서리 사이에 추가 삼각형 영역을 채웁니다.
연결된 세그먼트는 외부 가장자리를 확장하여 단일 지점에 연결함으로써 결합되며 추가 마름모 모양 영역을 채우는 효과가 있습니다. 이 설정은 miterLimit아래 설명된 속성에 의해 영향을 받습니다.
function draw() {
  // Canvas 지원하는지 안하는지
  if (canvas.getContext) {
    const ctx = canvas.getContext("2d");
    // drawing code here

    ctx.lineWidth = 10;
    ["round", "bevel", "miter"].forEach((lineJoin, i) => {
      ctx.lineJoin = lineJoin;
      ctx.beginPath();
      ctx.moveTo(-5, 5 + i * 40);
      ctx.lineTo(35, 45 + i * 40);
      ctx.lineTo(75, 5 + i * 40);
      ctx.lineTo(115, 45 + i * 40);
      ctx.lineTo(155, 5 + i * 40);
      ctx.stroke();
    });
  } else {
    window.alert("canvas가 지원하지 않는 브라우저입니다.");
  }
}
13. line dash
아래는 20milliseconds미다 움직이는 dash line을 표현했다
const canvas = document.getElementById("tutorial");
const ctx = canvas.getContext("2d");
let offset = 0;

function draw() {
  ctx.clearRect(0, 0, canvas.width, canvas.height);
  ctx.setLineDash([4, 2]);
  ctx.lineDashOffset = -offset;
  ctx.strokeRect(10, 10, 100, 100);
}

function march() {
  offset++;
  if (offset > 5) {
    offset = 0;
  }
  draw();
  setTimeout(march, 20);
}

march();
지금까지 도형 그리기, 선긋기 위주로 정리해 보았습니다.
댓글